If the kids like creating something fun and exciting they'll love this DIY upcycled DIY snow globe! They even get to place “snow” in side and create their own Christmas landscape.

DIY Upcycled Snow Globe
This craft is made of light materials so it can easily be hung on a tree or around the house. The best part is this craft is budget friendly and a great bonding experience for the whole family. Let's get ready to craft!

Prepare all materials needed for this tutorial:
- a clear plastic cup
- a piece of white fruit cover foam/mesh, found on pomegranates and sometimes oranges
- [easyazon_link identifier=”B00O2MZ07K” locale=”US” tag=”reamom0b-20″]½ cm wide red satin ribbon[/easyazon_link]
- a pair of scissors
- [easyazon_link keywords=”hot glue” locale=”US” tag=”reamom0b-20″]hot glue[/easyazon_link]
- a piece cardboard
- a piece of big wooden bead, optional
- 3 pcs. [easyazon_link keywords=”pipe cleaner” locale=”US” tag=”reamom0b-20″]pipe cleaner[/easyazon_link] (red or yellow, green and brown)
- a pencil

Step 1: Trace the mouth of the plastic cup to the cardboard.

Step 2: Cut a short piece of brown pipe cleaner. This should be at least 4 to 6 centimeters long. This will serve as the trunk of the small Christmas tree.

Step 3: Cut short random sizes of the green pipe cleaner. This will be the leaves of the small Christmas tree.

Step 4: Wrap the short green pipe cleaners around the trunk of the small Christmas tree. Apply a considerable amount of glue in the middle of the trunk to avoid the leaves from falling off.

Step 5: Hot glue small Christmas tree inside the circle on the cardboard.

Step 6: Create a small star from the red pipe cleaner and hot glue this on the topmost part of the small Christmas tree. You can also use a yellow pipe cleaner as an alternative.

Step 7: Make a reindeer from the brown pipe cleaner. Take note of the details of the reindeer like the body, the hooves, the legs and the head.

Step 8: Generously glue the reindeer beside the small Christmas tree just inside the circle of the cardboard.

Step 9: Cut the fruit cover foam/mesh into small bits of pieces, I get these on my pomegranates and sometimes oranges or tangerines. This will be used as the snow of the snow globe. Make sure that it is tiny enough to accommodate the size of the small plastic cup. If you can't find any of the foam anything fluffy will work including sparkles!

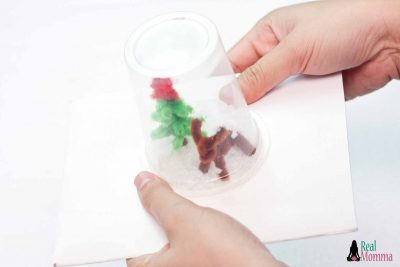
Step 10: Place a considerable amount of the foam snow inside the plastic cup. Place the small Christmas tree and reindeer inside the plastic cup. The trace should be aligned to the mouth of the plastic cup. Generously run hot glue around the mouth of the plastic cap to permanently seal it together with the cardboard.
Step 11: Turn the cardboard upside down and let the snow foam fall off the Christmas tree and the reindeer.

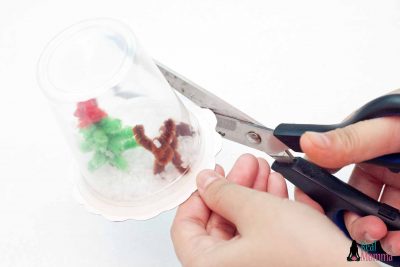
Step 12: Cut the excess cardboard around the mouth of the plastic cup. Make sure to leave at least 1 centimeter around it.
Step 13: Create some decorations from the outer excess cardboard.
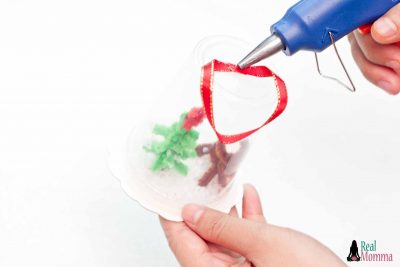
Step 14: Cut about 10 cm/4 inches of red satin ribbon. Hot glue this from end to end. Place this in the topmost part of the snow globe and generously glue this. This will be used to hang the snow globe. Let it dry for some minutes.

Step 15: Insert the big wooden bead, if you choose, on the red satin loop. This will accentuate the snow globe further.
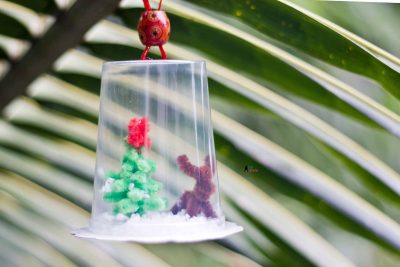
Step 16: Finally done! You now have an amazing hanging snow globe ready for display.
This DIY snow globe is child proof so you don't have to worry about it falling and breaking. It can easily be hung from your Christmas tree or mantle. Have fun with it and personalize it based on your needs, you could even use them as place settings around the dinner table.
What's your favorite holiday craft?
If you like crafting and DIY you'll want to check these out too:


1 Comment
These are so cute! They look like a lot of fun to make.